
Phase 1: Locate
To identify survey themes, you will use your TJC Action Tracker as a powerful analytical tool. The key is to employ its sorting and filtering functions to automatically group data; for instance, you can sort by the “Chapter” or “Department(s) Responsible” columns to see if one area dominates the findings. Another tool for this phase is the “Five Whys” root cause analysis technique, where you ask “why” five times for a high-risk finding to drill down past the surface-level problem to the true systemic issue. This analysis allows you to synthesize and name 3-5 major themes, such as “Inconsistent Monitoring & Documentation,” which helps you focus on fixing root causes instead of individual problems.
What would you like me to fetch?
Phase 1: Locate the Documents - In Depth
This is your most important and official source. The final accreditation report and your hospital’s submitted corrective actions (known as Evidence of Standards Compliance, or ESC) are stored here.
Step 1: Gain access to your hospital's Joint Commission Connect™ secure portal.
While you wait for portal access, search your hospital’s shared network drives. Previous leaders likely stored working copies here.
- Contact your hospital's CEO or the previous Quality Director's administrative support. They should have the login credentials or can designate you as the new primary accreditation contact.
- If no one knows the login, the CEO or designated contact person can call The Joint Commission's support line to reset access.
- Once logged in, navigate to the "Review/Respond to Survey Findings" section.
- Locate the report from your last triennial survey (approximately 3 years ago). Download the following documents as PDFs:
- The Final Accreditation Report: This will contain all the Requirements for Improvement (RFIs).
- The SAFER™ Matrix: This is a critical visual tool that prioritizes the findings by risk level (High, Medium, Low) and scope (Widespread, Pattern, Isolated).
- Your Hospital's Submitted ESC:: This is the corrective action plan your hospital submitted and The Joint Commission accepted.
Step 2: The Secondary Source - Internal Network Drives
While you wait for portal access, search your hospital’s shared network drives. Previous leaders likely stored working copies here.
- Look for folders named: Quality, Accreditation, Regulatory, TJC, Joint Commission, or Survey.
- Use the search function for keywords like: TJC Report, SAFER Matrix, ESC, Plan of Correction, POC, and the year of the last survey (e.g., 2022 Survey).
Step 3: The Human Element - Institutional Knowledge
People are a critical part of your information-gathering workflow.
- Schedule brief (15-minute) meetings with the Chief Nursing Officer (CNO), Facilities Manager, Pharmacy Director, and Lab Director.
- Ask them: "Can you recall our most significant findings from the last Joint Commission survey? What were your department's specific challenges, and what did we implement to fix them?" Their memory can point you to the most critical areas to validate.
Phase 1: Tools
These tools are related to the three steps within Phase 1 of this workflow.
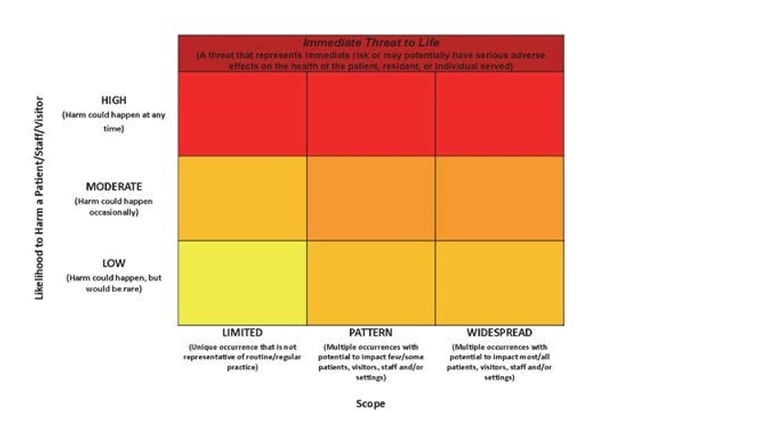
The SAFER™ Matrix
The SAFER Matrix (Survey Analysis for Evaluating Risk) is a tool developed by The Joint Commission to help healthcare organizations analyze and prioritize patient safety risks. It provides a visual representation of a patient safety issue by plotting its likelihood of causing harm against the scope of the problem. Download Here
Phase 2: Analyze
Next, the Analyze phase is where you turn static reports into a usable tool. The key here is to create a spreadsheet called the “TJC Action Tracker” using a program like Excel or Google Sheets. You’ll systematically transfer every finding from the old report and its corresponding solution into this tracker. This single action transforms scattered information into a centralized, sortable database that becomes the foundation of your survey readiness program.
What would you like me to fetch?
Phase 2: Analyze the Findings (Building Your Readiness Tool) - In Depth
This is where automation through organization begins. You will create a central tracking tool that will become the foundation of your survey readiness program
Step 1: Create a Centralized Survey Tracker
Use a spreadsheet program (Microsoft Excel, Google Sheets) to create a “TJC Action Tracker”. This is more powerful than a static document because you can filter, sort, and update it easily.
- Create a spreadsheet with the following columns:
| Standard ID | EP | Chapter | Finding Text (from TJC report) | SAFER™ Matrix Placement | Department(s) Responsible | Original Corrective Action Plan (from ESC) | Current Status | Evidence of Sustained Compliance | Gaps Identified (2025) |
|---|---|---|---|---|---|---|---|---|---|
| NPSG.03.05.01 | 1 | National Patient Safety Goals | "Observed two unlabeled syringes on the anesthesia cart in the ED trauma bay." | High Risk, Isolated | Emergency Dept, Pharmacy | 1. Re-educated all ED nurses... 2. Implemented weekly audits... | (Leave blank for now) | (Leave blank for now) | (Leave blank for now) |
Step 2: Populate the Tracker
Systematically transfer every RFI from the old survey report into your new tracker.
- Go through the Final Accreditation Report and the SAFER™ Matrix finding by finding.
- For each RFI, copy and paste the information into the corresponding columns in your spreadsheet:
- Standard ID (e.g., PC.01.02.03)
- EP (Element of Performance number)
- Chapter (e.g., Environment of Care)
- Finding Text (The surveyor's exact words)
- SAFER™ Matrix Placement (e.g., Medium Risk, Pattern)
- Department(s) Responsible (Make your best guess based on the finding)
- Next, open the submitted ESC document. Find the corresponding standard and copy the hospital's official corrective action plan into the Original Corrective Action Plan column.
You have now “automated” the review process by converting static PDF reports into a dynamic, actionable database.
Step 3: Document Your Validation Findings
As you complete each validation tracer, update the final three columns of your TJC Action Tracker. This closes the loop.
- Current Status: Mark as Compliant, Partially Compliant, or Non-Compliant.
- Evidence of Sustained Compliance: Briefly describe what you found. e.g., "Observed all meds labeled correctly. Staff interviewed were knowledgeable of policy. Audit logs for past 6 months are complete."
- Gaps Identified (2025): If compliance has slipped, describe the gap precisely. e.g., "Staff knowledgeable, but weekly audit logs stopped being completed as of January 2025. The process is no longer being monitored."
Phase 2: Related Tools
This is where automation through organization begins. You will create a central tracking tool that will become the foundation of your survey readiness program
Phase 3: Validate
Finally, the Validate phase confirms if past fixes are still in place. You’ll use your TJC Action Tracker to sort and prioritize problems by risk level. For each high-priority issue, you’ll conduct a “Validation Tracer,” which is a focused mini-investigation. During the tracer, you’ll use the “look, ask, review” method to observe the process, talk to staff, and check documents. You then record your findings back into the tracker, which instantly updates it to become your new action plan for getting ready for the next survey.
What would you like me to fetch?
Phase 3: Validate the Corrective Actions (From Paper to Practice)
This is the most critical phase. An accepted plan from three years ago does not guarantee current compliance. Your job is to verify that the fixes are still in place and working effectively.
Step 1: Prioritize Your Validation Efforts
Use the SAFER™ Matrix data in your tracker to prioritize your work
- Sort your TJC Action Tracker by the SAFER™ Matrix Placement column. Start with anything marked High Risk. Then move to Widespread and Pattern findings before addressing Low Risk or Isolated ones.
Step 2: Conduct "Validation Tracers"
For each high-priority item, go to the identified department and investigate. This is a mini-tracer focused on the past deficiency.
Use the “look, ask, review” method:
- Look: Go to the location. Using the unlabeled syringe example, go to the ED. Look at the anesthesia cart. Are all medications labeled? (Observation)
- Ask: Talk to the staff. Ask an ED nurse, "What is our policy on labeling medications? Can you show me how you would draw up and label a medication now?" (Staff Interview)
- Review: Check the paperwork. Ask the ED manager, "Can I see the weekly labeling audits that were started three years ago? I'd like to see the logs for the last three months." (Document Review)
You have now “automated” the review process by converting static PDF reports into a dynamic, actionable database.
Phase 3: Related Tools
This is the most critical phase. An accepted plan from three years ago does not guarantee current compliance. Your job is to verify that the fixes are still in place and working effectively.